3D Jelly Cakes are a breathtaking fusion of art and dessert. These translucent, multi-layered cakes feature intricate designs and vibrant colors, making them a showstopper for special occasions. Despite their elaborate appearance, these cakes are surprisingly easy to create with the right tools and techniques.

What Makes 3D Jelly Cakes Special?
These cakes are a feast for the eyes and the palate. The transparent jelly canvas allows for stunning 3D floral or artistic designs, often created using edible tools like syringes and food coloring. Perfect for birthdays, weddings, or gifting, 3D Jelly Cakes are an innovative way to elevate your dessert game.
Ingredients for 3D Jelly Cake
For the Clear Jelly Base
- Agar-Agar Powder: 2 tsp
- Sugar: 1/2 cup
- Water: 3 cups
- Vanilla Extract or Fruit Essence: 1 tsp (optional)
For the Colored Jelly (Design)
- Agar-Agar Powder: 1 tsp
- Condensed Milk: 1/2 cup
- Water: 1 cup
- Food Coloring: Assorted colors
- Edible Flower Tools or Syringes: For creating designs
Step-by-Step Recipe for 3D Jelly Cakes

Step 1: Prepare the Clear Jelly Base
- In a saucepan, combine agar-agar powder, sugar, and water.
- Heat the mixture over medium heat, stirring continuously until the agar-agar dissolves completely.
- Remove from heat and stir in vanilla extract or fruit essence.
- Pour the clear jelly mixture into a round mold or cake pan and let it set completely in the refrigerator.
Step 2: Prepare the Colored Jelly
- In another saucepan, mix agar-agar powder, condensed milk, and water.
- Heat over medium heat, stirring until fully dissolved.
- Divide the mixture into separate bowls and add food coloring to each.
- Keep warm to prevent the jelly from setting prematurely.
Step 3: Create the 3D Design
- Use syringes or edible flower tools to inject the colored jelly into the clear jelly base.
- Start with petals, using different colors for depth, and add stems or leaves as desired.
- Work slowly to ensure clean lines and a realistic design.
- Let the cake set in the refrigerator for 1-2 hours.
Step 4: Unmold and Serve
- Once fully set, gently loosen the edges of the cake and invert it onto a serving plate.
- Serve chilled for the best texture and flavor.
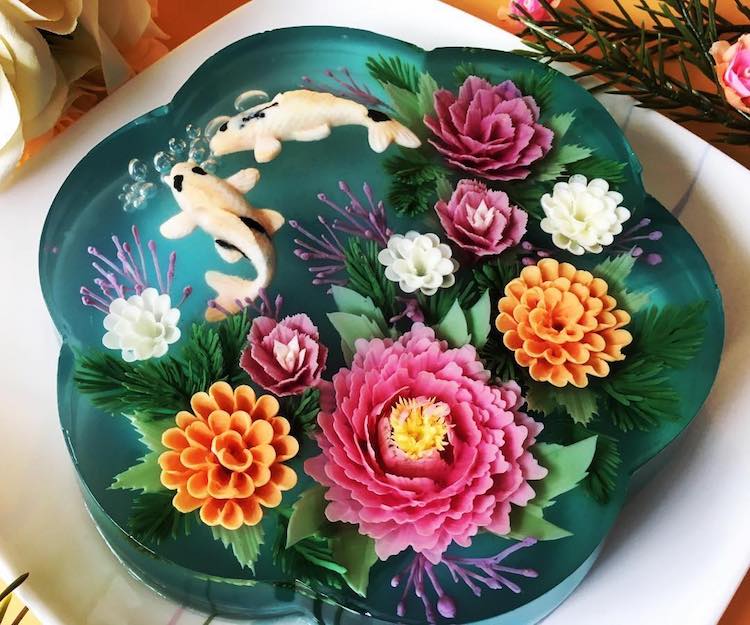
Design Ideas for 3D Jelly Cakes
- Floral Motifs: Roses, daisies, or orchids
- Themed Designs: Seasonal motifs like snowflakes or tropical leaves
- Abstract Patterns: Swirls, geometric shapes, or color gradients
Tips for Perfect 3D Jelly Cakes
- Use Clear Molds: Transparent molds make it easier to visualize and create your designs.
- Work Quickly: Agar-agar sets faster than gelatin, so maintain a steady pace.
- Warm Colored Jelly: Keep the colored jelly warm to prevent it from setting prematurely.
- Practice Patience: Intricate designs may take time, but the results are worth it.
Nutritional Value (Per Serving)
- Calories: 120
- Carbohydrates: 28g
- Fats: 1g
- Protein: 1g
Read More: The Ultimate Guide to the Perfect Tonkotsu Ramen Recipe: Rich and Creamy Comfort in a Bowl
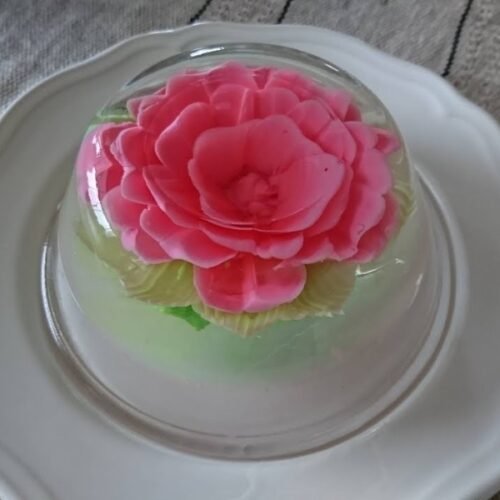
3D Jelly Cakes
Equipment
- Saucepan
- Round mold or cake pan
- Edible flower tools or syringes
Ingredients
Ingredients for Clear Jelly Base
- 2 tsp agar-agar powder
- 1/2 cup sugar
- 3 cups water
- 1 tsp vanilla extract or fruit essence optional
Ingredients for Colored Jelly
- 1 tsp agar-agar powder
- 1/2 cup condensed milk
- 1 cup water
- Assorted food coloring
Instructions
- Prepare the clear jelly base and set in the refrigerator.
- Make the colored jelly and keep warm.
- Inject designs into the clear jelly using syringes or tools.
- Chill until fully set, unmold, and serve.
Notes
- Use natural food coloring for a healthier option.
- Experiment with flavors like fruit extracts or herbal infusions.
- Store in the refrigerator for up to 3 days.
Conclusion
3D Jelly Cakes are more than just desserts—they’re edible works of art. With their vibrant designs and refreshing flavors, these cakes are perfect for impressing your guests or adding a creative touch to any celebration. Try this recipe and unleash your inner artist to create a masterpiece that’s as delicious as it is beautiful.

